

Copley Motor Drive Setup, Configuration and Modbus Communication Issue Solved.
- LS
- Oct 26, 2022
- 3 min read

Today we are configuring a compact motor drive that will control a reactor agitator motor in a chemical R&D lab. A few years ago ACI did the automation in this lab for reactor #1 with plans on adding a second reactor later on. The project is finally underway so we will be adding the second motor drive to the panel housing the one for reactor #1. Before installation, the drive must be configured correctly and today we will do just that. First thing we need to do is get the Copley Controls CME2 V8.0 configuration software installed. This program was downloaded from the Copley website. It is always a good idea to have all the manuals and documentation you may need to reference while configuring your drive, so make sure that is all in one spot. Then we connect the drive to 24VDC and power it up. Before we load the configuration file, the IP needs to be set. To do that we have to connect up to the drive via RS-232 serial connection, then using the Copley ASCII Interface we can set the IP. Please refer to the ASCII Programmers Guide PDF on the Copley Website for specific information. We have the configuration file saved from the first drive we setup for this lab so this will be a fairly quick process to get configured. For a first time setup though, you need to know the requirements/parameters of the device being controlled and what the project specifications are so you can set the drive up properly. This drive has a wide range of settings and functions so reading through the user manual to fully understand its capabilities is critical to the success of your application. Then connect the drive to your local network or computer so configuration can begin. Once you start the program it will ask you how you would like to communicate with the drive. Select the option that works for you.
For our configuration we will be using the EtherCAT method of communication. Once we are connected to the drive and communication has been established, we can download our configuration file from RX1 and modify it for RX2.

Once we have our configuration loaded and modified for reactor #2 we save it to the drive. Now, we move on to testing the Modbus communication. Hopefully it will communicate (Morgan Freeman voice: "Little did they know that it was NOT going to communicate"). First, we will test using our proprietary Modbus testing program, Modbus Viewer. Once we get confirmation we are reading data we will move over to testing the HMI and control program communication.


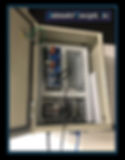
The final step is to pack it up and ship it to the customer so they can get it ready for us to start up when we arrive on site at a future date. The drive will be mounted and terminated in a panel we built and installed a while back during the labs initial commissioning.

We only ran into one issue and that was the firmware. For some reason the firmware from the factory was not letting us communicate via Modbus. We struggled with this for a bit then we contacted Kevin Krewson with Olympus Controls and had a Teams meeting. He determined the issue and informed us on the fix and we got it working in under half an hour. Thanks Kevin!
Our documentation on setting up the first drive left much to be desired. We failed in that regard. In our defense, it was 2018 when we set up the first drive and our documentation processes have significantly improved since then.